In this article, let’s discuss implementing a distributed priority queue using Hazelcast.
What is a Priority Queue?
As the name suggests, a priority queue is a data structure similar to a queue. The only difference is that the priority queue serves the items as per a pre-defined priority. Importantly, the dequeue operation of a priority queue returns the high-priority items first. Moreover, if items have the same priority, it uses the insertion order.
What is Hazelcast Priority Queue?
The Hazelcast Priority Queue is a distributed implementation of the priority queue data structure. As a matter of fact, it’s a Hazelcast Queue only with an additional configuration. This additional configuration is the name of a comparator class. It determines the priority of the items in the queue.
The Distributed Priority Queue Example
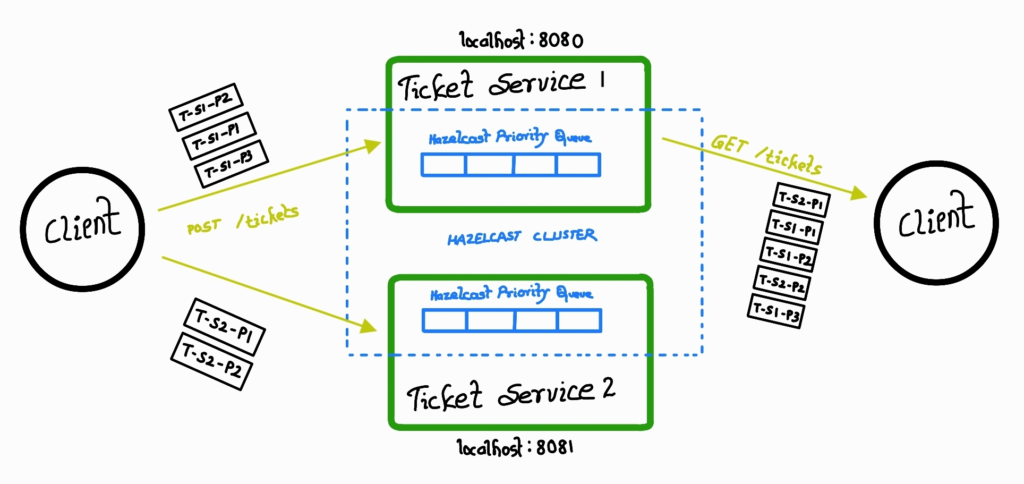
So, let’s first understand the use case we are going to implement in this example. Here, we’ll build a simple ticket-processing service using Spring Boot. Also, we’ll run multiple instances of this service.
Clients of this service should be able to submit tickets to any of the instances of the service. In addition, these tickets will have the priorities associated with them. Furthermore, the clients who want to process the tickets should be able to fetch all the tickets sorted in the order of priority.
Therefore, we’ll implement the Hazelcast Priority Queue to take care of this requirement. The diagram below shows the example we’re going to implement.

So, let’s start with the code!
The Code Example
To start with, we’ll create a Spring Boot web application using the Spring Initializr.
Hazelcast Maven Configuration
Next, we’ll add the Hazelcast dependency to the pom.xml:
<dependency>
   <groupId>com.hazelcast</groupId>
   <artifactId>hazelcast-spring</artifactId>
   <version>5.3.6</version>
</dependency>
The Ticket Class and The Comparator
Now, we’ll create the Ticket class:
@Data
@AllArgsConstructor
@NoArgsConstructor
public class Ticket implements Serializable {
    @Serial
    private static final long serialVersionUID = -175102428087953335L;
    private String id;
    private String name;
    private Short priority;
}
In addition, let’s create the TicketPriorityComparator class. Notably, we’ll use this class to determine the priority in the queue.
public class TicketPriorityComparator implements Comparator<Ticket> {
    @Override
    public int compare(Ticket first, Ticket second) {
        return first.getPriority().compareTo(second.getPriority());
    }
}
Hazelcast Priority Queue Configuration
Furthermore, we’ll now create the HazelcastConfig class. Here, we’ll define a bean for HazelcastInstance with minimal configuration for the Hazelcast Priority Queue.
@Configuration
public class HazelcastConfig {

    @Value("${ticket.queue.name}")
    private String ticketQueueName;

    @Bean
    public HazelcastInstance hazelcast() {
        Config config = new Config();

        // Configure the priority queue
        QueueConfig queueConfig = config.getQueueConfig("default");
        queueConfig.setName(ticketQueueName)
                .setPriorityComparatorClassName(TicketPriorityComparator.class.getName());

        config.addQueueConfig(queueConfig);

        return Hazelcast.newHazelcastInstance(config);
    }
}
It should be noted that we’ve defined a Hazelcast Queue configuration and set the priorityComparatorClassName property to the TicketPriorityComparator class name. This enables the Hazelcast Queue to act as the Priority Queue.
Developing the Ticket Service APIs
To keep this example simple, we’ll implement the /tickets API resource with two endpoints.
/tickets – The POST endpoint to create a ticket
/tickets – The GET endpoint to get the tickets sorted based on priority
So, first, we’ll create the TicketController class:
@RestController
@RequestMapping("/tickets")
public class TicketController {

    private final TicketService service;

    @Autowired
    public TicketController(TicketService service) {
        this.service = service;
    }

    @PostMapping
    public ResponseEntity<Ticket> createTicket(@RequestBody Ticket ticket) {
        Ticket createdTicket = service.createTicket(ticket);
        return ResponseEntity.ok(createdTicket);
    }

    @GetMapping
    public Collection<Ticket> getAllTickets() {
        return service.getAllTickets();
    }
}
Now, let’s create the TicketService class:
@Service
public class TicketService {

    private final HazelcastInstance hzInstance;
    private final String ticketQueueName;

    @Autowired
    public TicketService(
            HazelcastInstance hzInstance,
            @Value("${ticket.queue.name}") String ticketQueueName
    ) {
        this.hzInstance = hzInstance;
        this.ticketQueueName = ticketQueueName;
    }

    public Ticket createTicket(Ticket ticket) {
        IQueue<Ticket> ticketQueue = hzInstance.getQueue( ticketQueueName );
        ticket.setId(UUID.randomUUID().toString());
        ticketQueue.offer(ticket);
        return ticket;
    }

    public Collection<Ticket> getAllTickets() {
        Collection<Ticket> tickets = new ArrayList<>();
        IQueue<Ticket> ticketQueue = hzInstance.getQueue( ticketQueueName );
        while(!ticketQueue.isEmpty()) {
            tickets.add(ticketQueue.poll());
        }
        return tickets;
    }
}
As we can see, we’ve injected the HazelcastInstance in the TicketService. When we create a ticket, the ticket is added to the priority queue.
Testing the Ticket Service
Finally, it’s time to test our application and see the distributed priority queue using Hazelcast in action.
To do that, we’ll first start the two instances of the application on separate ports – 8080 and 8081. For this, we can create two run configurations in our IDE – one on the default port and the other with the VM argument -Dserver.port=8081.
After we start both the servers, we can verify the Hazelcast cluster formation in the logs.
Members {size:2, ver:2} [
  Member [172.23.112.1]:5701 - 0da9d0e6-a328-44a7-b6a5-66db398c9694
  Member [172.23.112.1]:5702 - 54f17a24-0ad7-4527-9db7-ca89b4774559 this
]
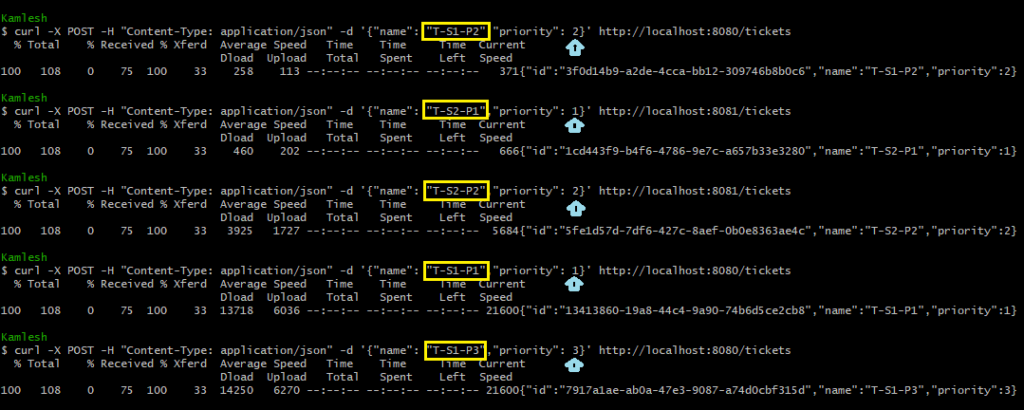
Now, we’ll send a few create ticket requests to one server and a few to another.
curl -X POST -H "Content-Type: application/json" -d '{"name": "T-S1-P2","priority": 2}' http://localhost:8080/tickets
curl -X POST -H "Content-Type: application/json" -d '{"name": "T-S2-P1","priority": 1}' http://localhost:8081/tickets
curl -X POST -H "Content-Type: application/json" -d '{"name": "T-S2-P2","priority": 2}' http://localhost:8081/tickets
curl -X POST -H "Content-Type: application/json" -d '{"name": "T-S1-P1","priority": 1}' http://localhost:8080/tickets
curl -X POST -H "Content-Type: application/json" -d '{"name": "T-S1-P3","priority": 3}' http://localhost:8080/tickets

Note the ticket name and the priority of each ticket. Now, let’s make a GET request to the /tickets endpoint to get all the tickets.
$ curl http://localhost:8080/tickets
% Total    % Received % Xferd  Average Speed   Time    Time     Time  Current
Dload  Upload   Total   Spent    Left  Speed
100   381    0   381    0     0  20012      0 --:--:-- --:--:-- --:--:-- 21166[
{"id":"1cd443f9-b4f6-4786-9e7c-a657b33e3280","name":"T-S2-P1","priority":1},
{"id":"13413860-19a8-44c4-9a90-74b6d5ce2cb8","name":"T-S1-P1","priority":1},
{"id":"3f0d14b9-a2de-4cca-bb12-309746b8b0c6","name":"T-S1-P2","priority":2},
{"id":"5fe1d57d-7df6-427c-8aef-0b0e8363ae4c","name":"T-S2-P2","priority":2},
{"id":"7917a1ae-ab0a-47e3-9087-a74d0cbf315d","name":"T-S1-P3","priority":3}]
Clearly, we can see how the server returns all the tickets from the priority queue. Even though we requested different servers to create tickets, the distributed queue makes all tickets available to a single server.
Moreover, we get the tickets with priority 1 first, then those with priority 2, and lastly the ticket with priority 3. Also, we can notice that the server returns tickets with the same priority in the order of the request we made.
Summary
To summarize, in this article, we’ve implemented a distributed priority queue using Hazelcast. We’ve also seen how it works in a distributed set-up with the help of a Spring Boot example.